Tutorial: Annotate a DeepLabCut dataset
Welcome! In this tutorial, we will import a DeepLabCut dataset, inspect it, test out annotation, and export it again.
An example dataset
In this tutorial, we will work with the mouse reaching dataset provided as an example in DeepLabCut repository. You may download the dataset from our mirror on google drive. Alternatively, you may download the DeepLabCut repository from github directly and then navigate to the example in the “examples/Reaching-Mackenzie-2018-08-30”.
This dataset is from Mathis et al, “Somatosensory Cortex Plays an Essential Role in Forelimb Motor Adaptation in Mice”, Neuron, 2017.
Importing annotations
Open Anivia, then follow the steps below to import this DeepLabCut dataset.
- In the menu, click on: Import > Load DeepLabCut dataset
- Navigate to your DeepLabCut project: Reaching-Mackenzie-2018-08-30
- Go within the “labeled-data” folder
- Select the folder “reachingvideo1” and click “Upload”
- Confirm you want to “upload” the files
The upload confirmation just means the folder is sent to the browser, not to a server. Everything is kept locally, with one notable exception below.
For the DeepLabCut h5 annotation specifically, the h5 file with labels must be sent to a server to convert it to a csv to parse due to limitations in javascript.
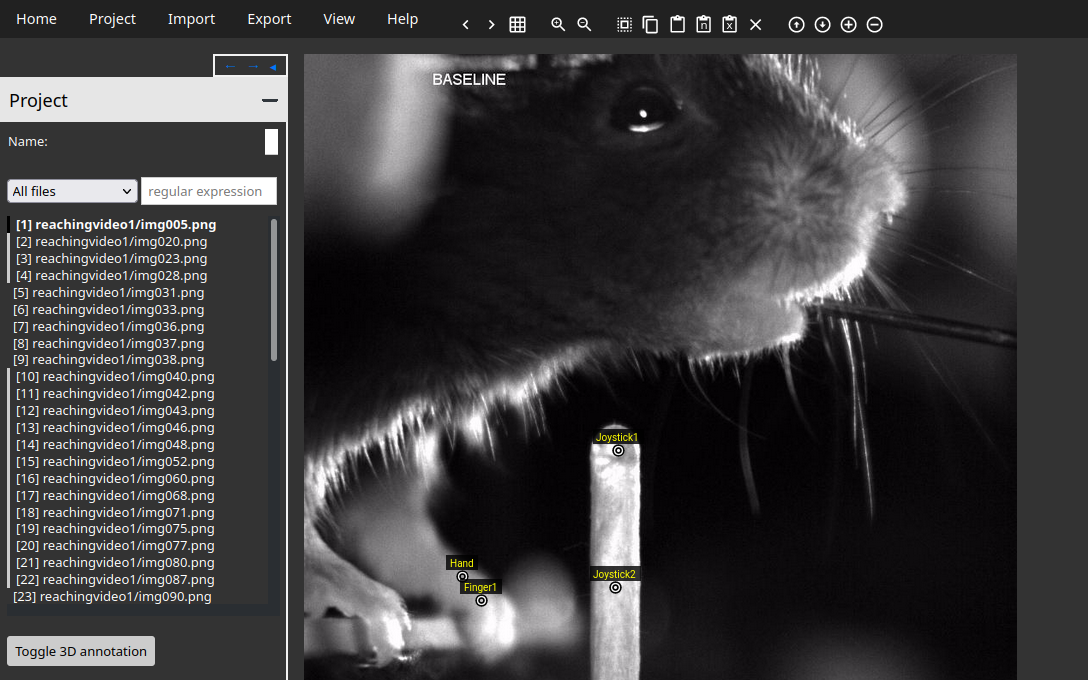
If you follow these steps correctly, your interface should look like the following image.

In the image above, you can see the different labeled points (Hand, Finger1, Joystick1, Joystick2) in the image.
To navigate across images, you can use the left/right arrow keys, clicking in the file menu, or click the left/right arrows in the toolbar.
Specifying bodyparts
Let’s look at the bodyparts for this dataset!
In the menu, click on: Project > Edit bodyparts
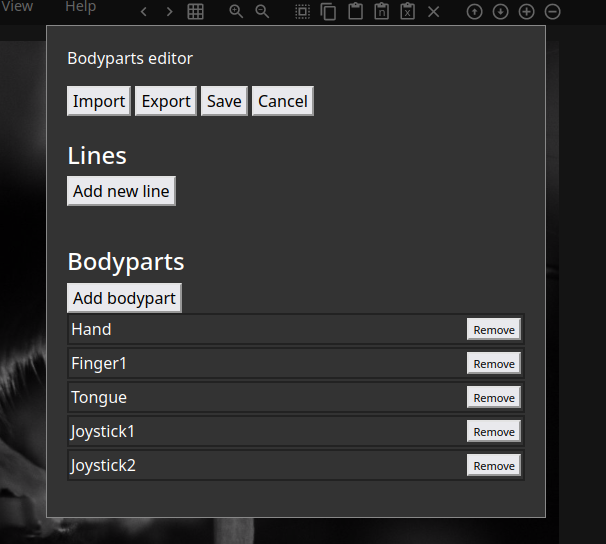
You will enter the Bodyparts editor, where you can add or remove bodyparts. It should look like the image below.

If you have some annotations within your files already, the bodyparts will automatically be populated as in this example. If there are no labels yet, you will need to specify bodyparts.
You can drag bodyparts around to change the order for labeling.
Optionally, you may export the bodyparts to a “bodyparts.toml” file by clicking Export. You can then import this file again to speed up adding bodyparts to a new dataset.
Annotating images
Okay let’s try to annotate!
Place keypoints by clicking in the image. The keypoints will be placed following the order of bodyparts. You can move a keypoint by clicking it and dragging it.
To mark a keypoint as not missing (not visible), place it in within 50 pixels of the top left corner.
Useful shortcuts:
- select a keypoint and press “d” (or X icon in toolbar) to delete it
- select all keypoints by pressing “a”
- select a keypoint and press “m” to mark as missing (moving to top left corner)
Exporting annotations
To export your annotations back, follow these steps:
- In the menu, click on: Export > Export Annotations (DeepLabCut format)
- Navigate to your DeepLabCut project: Reaching-Mackenzie-2018-08-30
- Go back within your labeled-data folder, then within the folder you selected (“reachingvideo1” in this case)
- Save your file as “CollectedData_Mackenzie.h5” within the “reachingvideo1” folder, replacing the current labels
For your own project, you will need to replace “Mackenzie” with the actual scorer name you specified at the top of your DeepLabCut config.yaml
That’s it!
Similarly to importing, due to limitations on h5 libraries in javascript, the labels are sent to server to convert them to generate an h5 file. Again, no images are ever sent out of your machine, only labels.